¶ Quick start guide
¶ Authorization
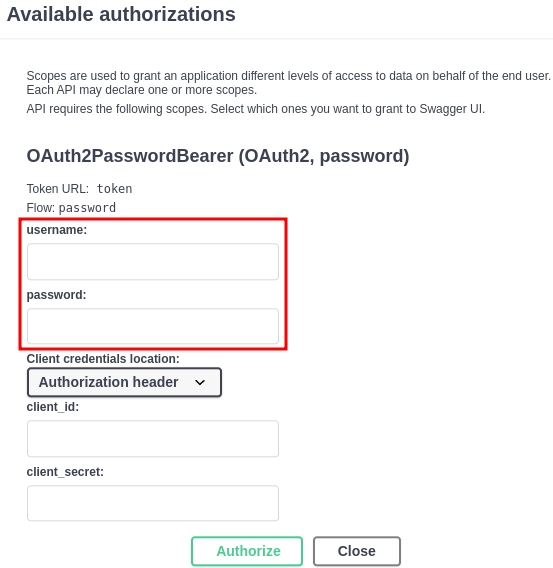
After entering WMbus backend, Authenticate yourself with given username and password:
¶ Adding new unit
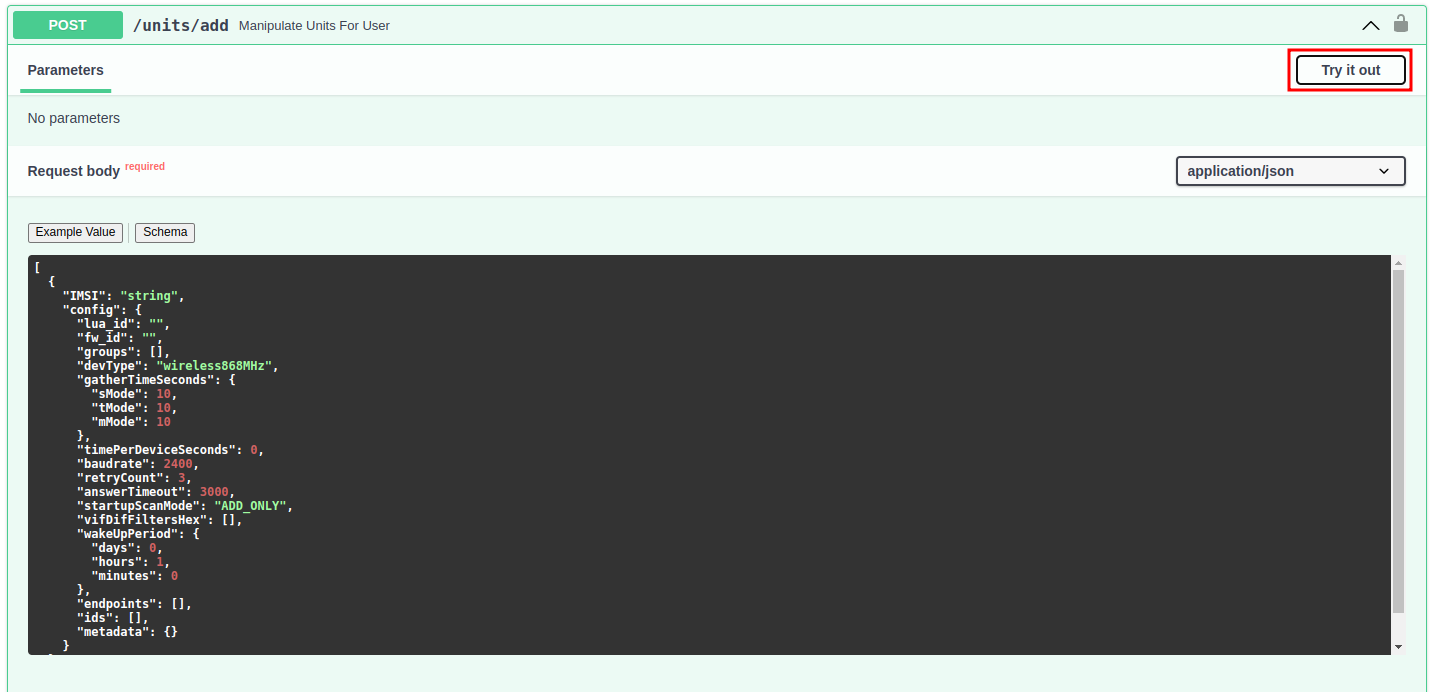
To add new unit, click on tab [POST] /units/add - Manipulate Units For User. By clicking on Try it out box, the configuration script will show up, already preffiled with example. Now replace IMSI "string" with IMSI of the SIM card, choose devType (wireless868MHz, or wiredMBus). In case of wireless868MHz, don't set uo VIF DIF filter and in case of wired Mbus empty "gatherTimeSeconds" field.
Now click on Execute
Bellow it will either write sucess, or error message giving you information where is the problem. Here is an example of the response, when the user isn't authorized:

¶ Configuring Unit
In case of changing configuration which was made in previous step, use tab named [POST] /unit/{identification}/config - Write Unit Config. By clicking on Try it out and then using IMSI as identification, you are now able to modify and execute (send) new configuration to the device.
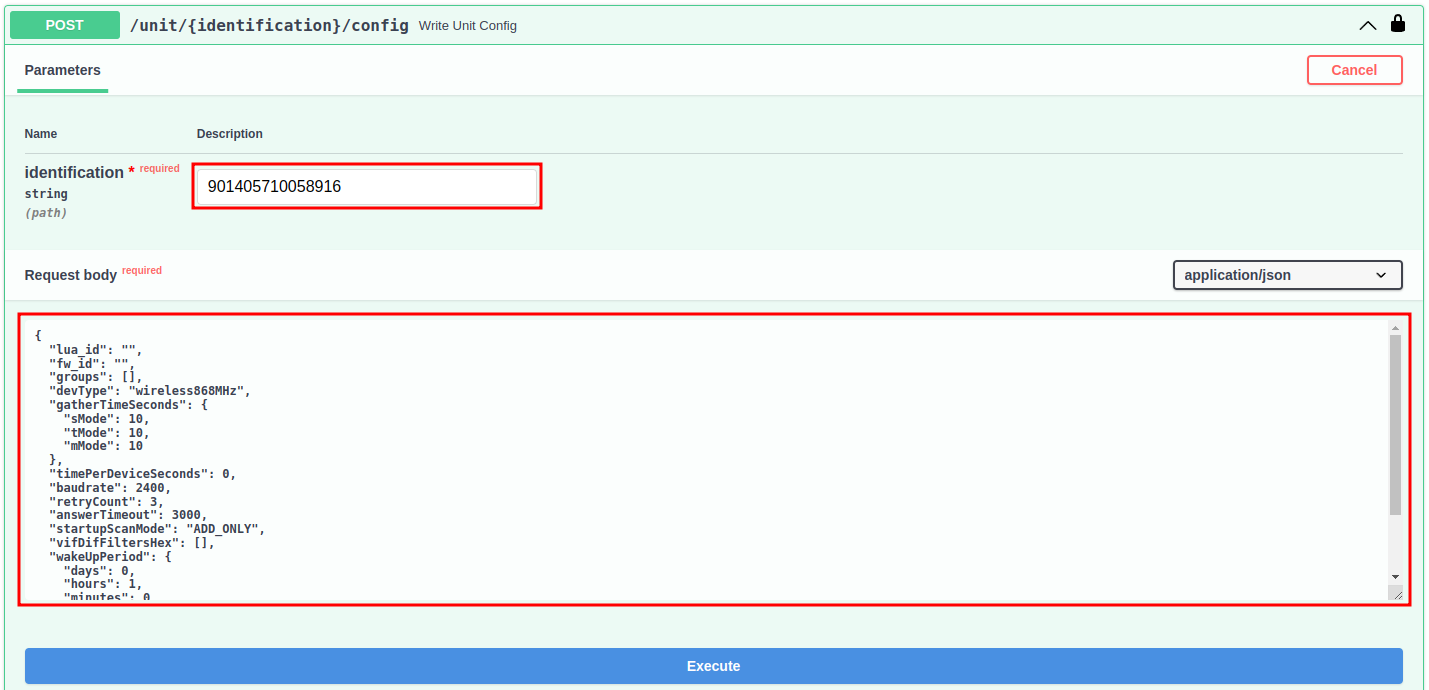
There is also tab [GET] /unit/{identification}/config - Read Unit Config, which will return actual configuration of the device.

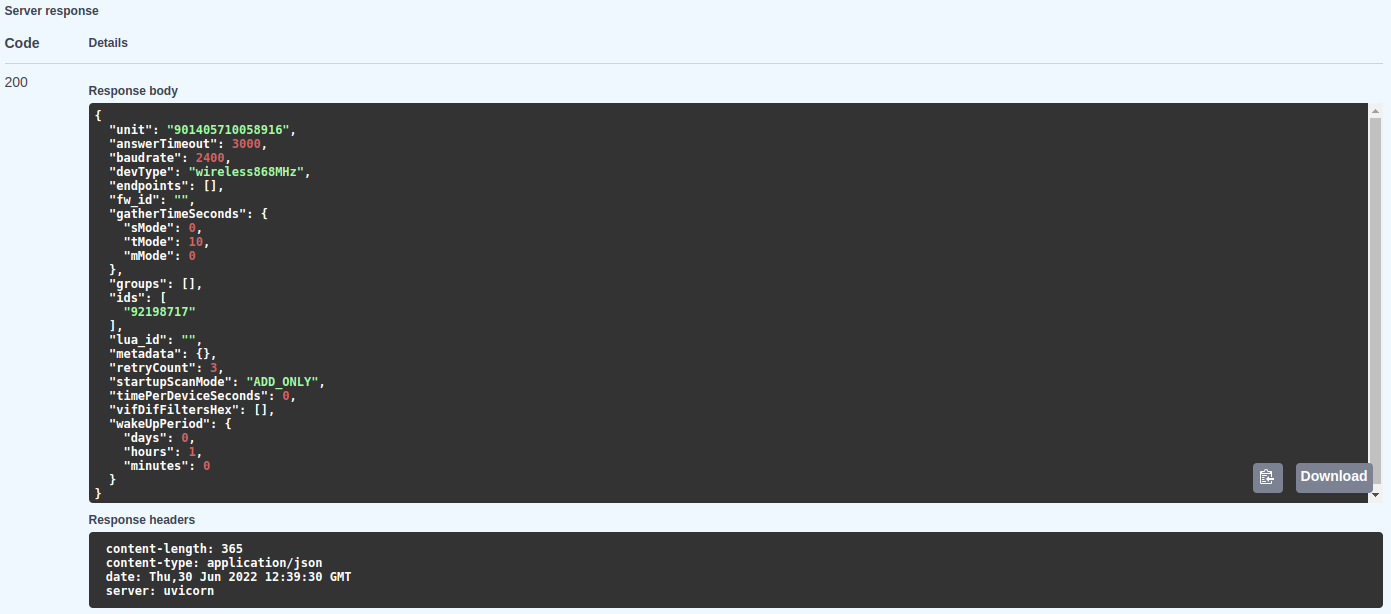
Response of the server looks similary to this:
¶ List Units
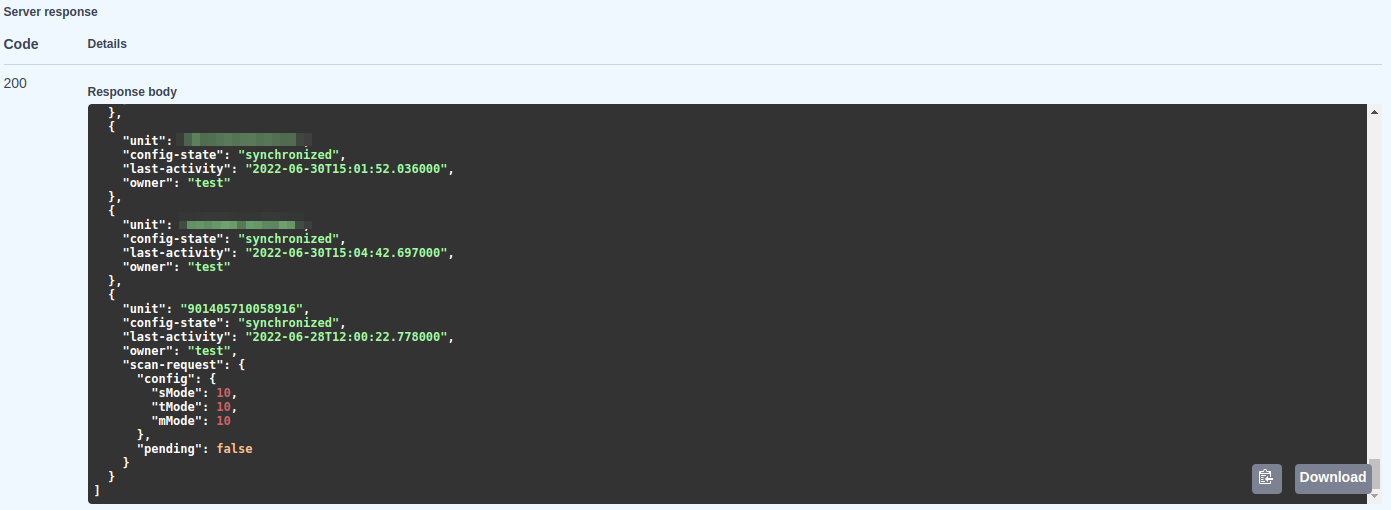
To list all added devices and some of it's configuration, you can use tab called [GET] /user/units - List Users Units
By clicking on Try it out and Execute you will get similar response to this (as you can see one of the units has same IMSI as mentioned in above):
¶ Adding meter
There are actually two ways you can add a meter. First one is by scanning for all units, or manually setting up the IDs.
¶ Unit scan
To scan for meters, use [POST] /unit/{identification}/scan - Control Unit Scan, which (when executed) will send a command to the device, to initialize scan. If device detects new IDs, it will send a result to the server and updates the list of IDs.
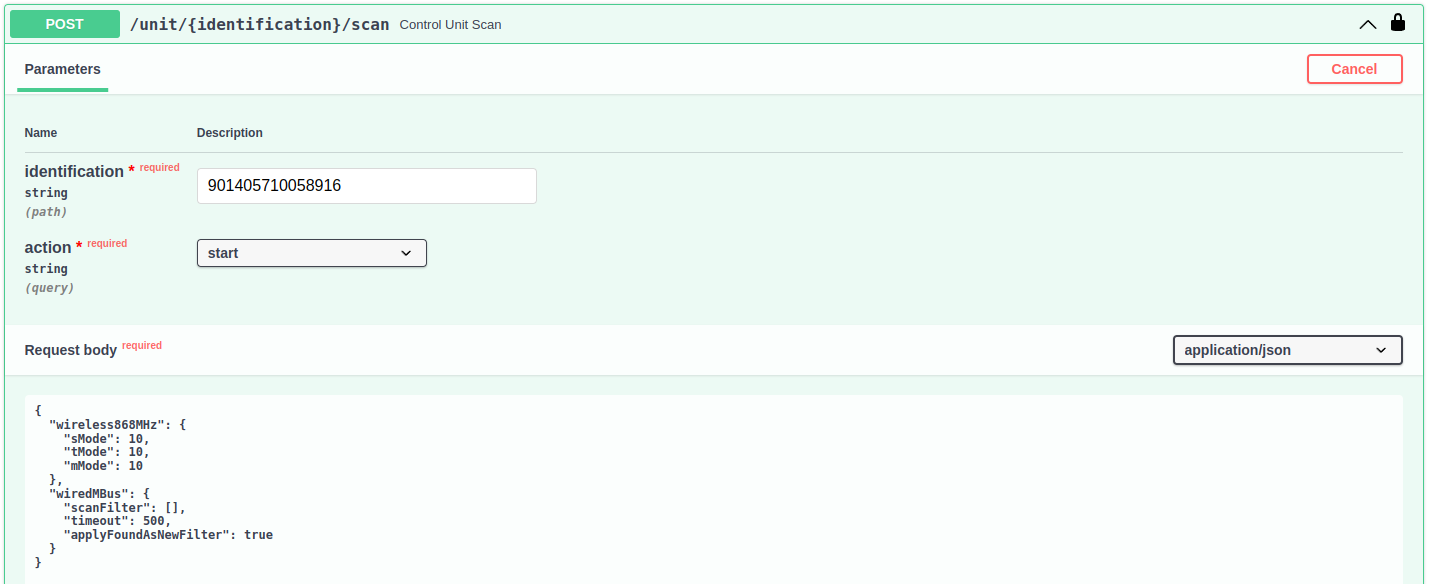
The list of IDs can be accessed over [GET] /unit/{identification}/scan - Read Unit Scan. Here is an example of the response:

¶ Manualy adding IDs
Adding IDs is possible during Unit configuration. If you look at last picture in this chapter, you can see se "ids" with one meter defined. Or you can use option [POST] /meter/add - Add Meter For User.

¶ Secondary addressing
To use secondary addressing, you need to set these 2 values:
- Below is an example of unit configuration (as described here), notice the configuration part called "vifDifFiltersHex", there you can define all VIF/DIF filters. Also pay attantion to formating, inside of an array "vifDifFiltersHex"[] are another two arrays. First array ["0E84"] with index 0 and second array ["0A"] with index one. This will allow you to set multiple VIF/DIF filters into the configuration for meter with defined vifDifFilterIndex (=index of an array).
{
  "unit": "901405710058916",
  "answerTimeout": 3000,
  "baudrate": 2400,
  "devType": "wiredMBus",
  "endpoints": [
  	"https://insert.enpoint.here"],
  "fw_id": "",
  "gatherTimeSeconds": null,
  "groups": [],
  "ids": [
    "01234567",
    "87654321"
  ],
  "lua_id": "",
  "retryCount": 3,
  "timePerDeviceSeconds": null,
  "vifDifFiltersHex": [
    [
      "0E84"
    ],
    [
      "0A"
    ]
  ],
  "wakeUpPeriod": {
    "days": 0,
    "hours": 1,
    "minutes": 30
  },
  "startupScanMode": 2
}
- Secondly you need to set "vifDifFilterIndex" for given meter. For that you need to know ID of the meter (list of meters can be found by using [GET] /meters - List Users Meters). To edit "vifDifFilterIndex", you need to use [POST] /meter/{identification}/metadata - Update Meter Metadata.

{"id": "01234567",
    "added-date": "2022-04-26T08:35:06.577465",
    "endpoints": [],
    "groups": [],
    "key": "",
    "metadata": {
      "manufacturer": "4204",
      "version": 32,
      "medium": 2,
      "vifDifFilterIndex": 1,
      "location": "black box"
    },
    "owner": "user",
    "parser_id": "mbus"
}
So if you use:
"vifDifFiltersHex": [
    [
      "0E84"
    ],
    [
      "0A"
    ]
  ],
with vifDifFilterIndex=1 for specified ID of a meter:
"metadata": {
      "vifDifFilterIndex": 1
    }
It will apply "0A" to that meter.
You can also use:
"vifDifFiltersHex": [
    [
      "0E84","AA","BB",
    ],
    [
      "0A"
    ]
  ],
"metadata": {
      "vifDifFilterIndex": 0
    }
Where it will apply "0E84","AA","BB" as VIF/DIF filter to that meter.
¶ Forwarding data
In the example above you can see an option called endpoint. If you enter an URL or IP address there, the data will be forwarded to this address.
¶ Parsing received data
Setting up parser is possible while adding a meter (here), or with option [POST] /meter/{identification}/parser - Update Meter Parser

List of available parsers:
- wmbus - standard wmbus parser with option to automatically detect driver for the meter.
- wmbus-analyze - standard wmbus parser with option to analyze the frame. It might give you a different results compared to "wmbus" parser.
- jmbus - parser done by the Fraunhofer Institute for Solar Energy Systems
- mbus - standard mbus parser
¶ Default meter configuration
Since Mbus meters can be automatically added to the list of meters (please note only Mbus meters can be added automatically), it's convenient to set up a default meter configuration. So when the meter is added, the proper parser is applied.
To set the default meter configuration, use option called [POST] /meter/default-config - Manipulate Default Config For User

To change default value only of the parser, you can use this as an example:
{
  "parser_id": "mbus"
}
¶ History log
To log a historic values, you need to first enable the logging. To do so, please use:
[POST] /user/history/settings - Set History Settings and set the required history. Example with 365 entries (1 year with a period once a day):
{
  "unitsHistory": 365,
  "metersHistory": 365
}
After this is set up you can access the historic readings of the unit or of the meter by using the:
[GET] /user/history/meter/{identification} - get meter history
or
[GET] /user/history/unit/{identification} - get unit history
¶ Debugging
To get a better understanding what is the unit sending and receiving you can use the implemented debugging log. To access the debug log, you can use the functions:
[GET] /user/debugLogTextLastDay - get the debug log for past 24 hours
[GET] /user/debugLogTextSince - get the debug log for the past X days
[GET] /user/debugLogText - get the whole log.
The web interface probably won't handle a large amount of the log, therefore it is better to access this function through the local console.
To clear the log, you can use the function:
[POST] /user/debug - Manipulate user debug log